Fill out a form
Tap Fill out a Form on either the Home Page or the Navigation Menu to open the Fill out a Form page. This page displays a list of form templates that the logged-in user has permission to fill out.
An internet connection is required to perform a pull-down sync on the library and check the server for any updates to templates in this list. Note: This does not do a push sync to the server.
To search for a specific form, tap into the Search field at the top of the page and begin typing the name of the form. The form list filters as you type. Tap the X at the right of the search field to clear the search and display the full list of forms.
To fill out a form
- Tap Fill Out A Form on the homepage, or tap Fill out a form in the navigation menu. The Fill Out a Form page will open with a list of blank forms available to fill out.
- Forms that include attachments will display Download Files to Device. Tap the download icon or text to begin downloading the attachment. Learn more about attachments.
- Tap on a form template in the list. The Form Properties page opens.
Embedded Files & Images
Getting Started
For each template downloaded to the device, any embedded files and images will not appear until the user taps the download icon or Download files to Device text. Attachments can be removed by tapping Remove Files from Device.
Available Space
Devices must have enough storage space to download embedded files and images. Devices without enough available space for downloading attachments will display a warning: "There is not enough space on your device to download files for this template. Please remove files for other templates from the device first."
Offline Mode
Embedded files and images can only be downloaded with a connection to the internet. If you plan to work offline and need the embedded files and images in your template, download attachments before going offline.
Note: Changes to a template's embedded files and/or images will require re-downloading the new files to the device.
Form Properties
General Information
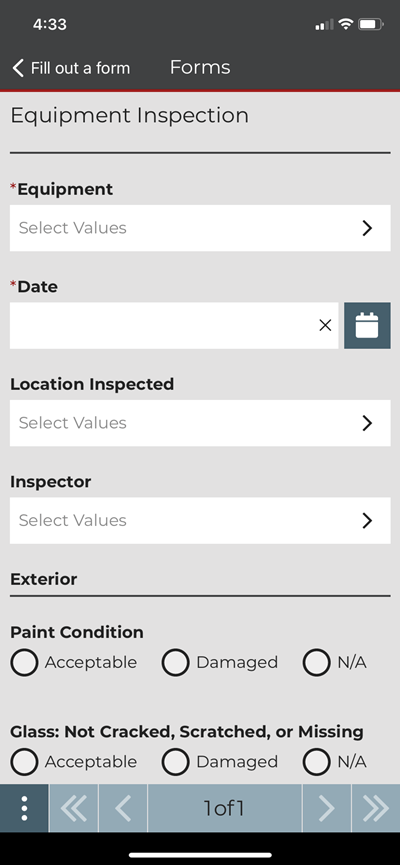
Starting a new form opens the Form Properties dialog. Form Properties collects initial information about the form:
- Form Name – The name of your form. When you select a form to fill out, the application automatically generates a form name that you can edit.
- Group – Click on this field to select a Group. If the Group field is disabled and populated with a value, then this field is not editable and a Sub-Group is required.
- Sub-Group – (Only visible with sub-group options set for the Group). A Group must be selected first before choosing a sub-group. A Sub-Group will be required if a Group is populated in the field. If the Sub-Group field is disabled and a value is showing in that field, then this field is not editable.
Approval Sequence
The Approval Sequence section appears any time a form requires approval.
To add an approver:
- Select a user from the Approver 1 menu.
- Tap Add Approver to add another approver to the form. Additional approver fields are not required.
- Tap Next to enter form. Tap Cancel to return to the Fill Out a Form page.
Required Fields
Fields marked with a red asterisk are required.
The Copy Form feature allows users to create a new form based on a previously filled out form.
Once copied, the new form will contain all of the original form data except for the following:
- Signature data
- Timestamp data
- Media Attachment data
- File Attachment data
Note: The Copy Form feature will only display the most recent form for each template that has been filled out by the current logged-in user on the device. If a new version of a template is published and the user does a sync to the server, the Copy Form feature will not display the most recent form for an old template version. This is by design because the application does not allow form fillers to create new forms based on non-current versions of a template.
How to Copy a Form:
- Navigate to the Fill Out a Form page.
- Click on the Copy Form button.
- Optional: Search for a form using the Search bar at the top of the page.
- Select a form from the list.
- Fill out the copied form exactly how you fill out a new form. Many of the data fields from the original form will appear copied into the new one.
Tap Next (>) on the Form Properties dialog to open the form and start filling out the form fields.
To page through the form, use the arrows at the bottom of each page.
- Tap << to return to the first page of the form.
- Tap < to return to the previous page of the form.
- Tap > to skip to the next page of the form.
- Tap >> to skip to the last page of the form.
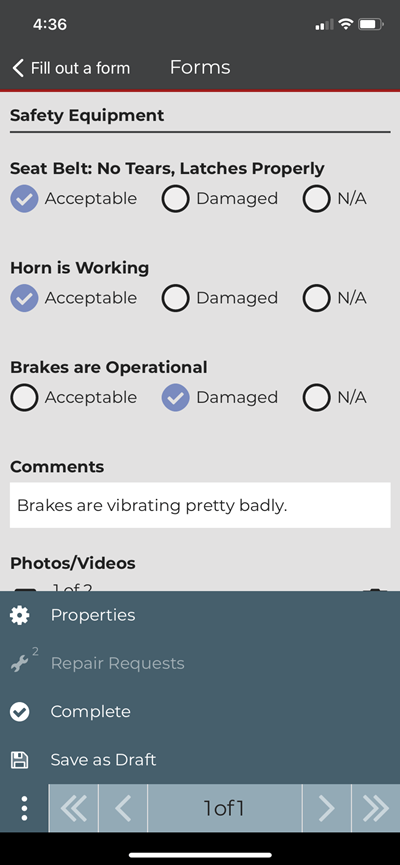
The Form Actions menu
Form Properties
Tap Properties to view the general information about the form.
Save as Draft
Tap Save as Draft to save your form before submitting.
Complete/Edit OR Submit/Recall
Complete – Forms that do not require approval will show the Complete option on the Form Actions Menu.
- Click Complete to indicate the form has been filled out and lock the form into read-only mode.
- If there are required fields or data that is not formatted correctly, the Form Errors dialog will pop up and ask you to address these issue before you can Complete the form. Go here to see more about Form Errors.
Edit – To make this form editable again, click the Edit option in the Form Actions Menu.
Submit – Forms that require approval show the Submit option on the Form Actions Menu.
- Click Submit to indicates the form has been filled out and lock the form into a read-only mode.
- Incomplete required fields or incorrectly formatted data will open the Form Errors dialog and prompt you to address the issues before you can complete the form. Learn more about Form Errors.
- Submitted forms on the Forms Page appear having a Pending colored purple.
Recall – To make this form editable again, click the Recall option in the Form Actions Menu.
Delete
Only forms with the status of Draft can be deleted. To delete the current form:
- Click Delete in the Form Actions menu.
- Tap Yes in the confirmation dialog to delete the form.
The Form Errors dialog appears when you tap Complete or Submit on the Form Actions menu with incomplete form components. The dialog lists components requiring completion and if they are formatted incorrectly.
Tap Ok to dismiss the dialog. Components that need completion display warning icons. After resolving all errors, you can Complete or Submit the form.
Filling out a form that supports the Repair Request Workflow follows the same steps as filling out any other type of form.
To fill out a form with Repair Requests:
- Select a form to fill out.
- Fill out the form. When criteria on the form meets conditions to generate a Repair Request in B2W Maintain, you will see a new icon on the toolbar, showing the number of Repair Requests that will be generated. This icon will be read only until the form is completed or submitted.


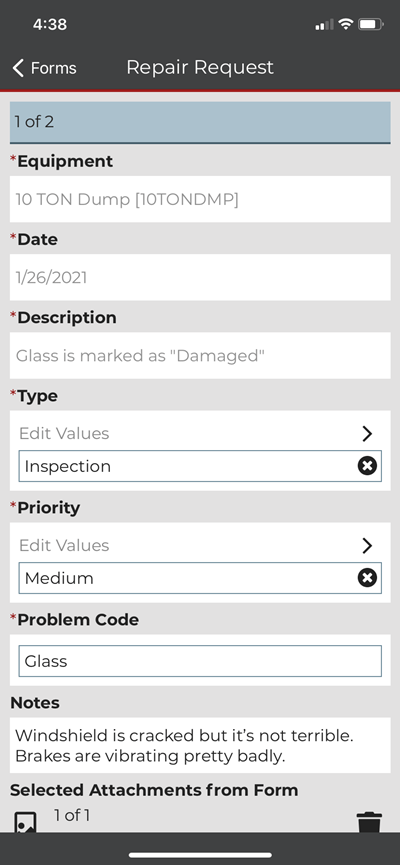
- Once you have finished filling out the form and click the Complete/Submit button the Repair Requests dialog will be displayed. Fill out any additional information that is required for each Repair Request.
Repair Request Field Definitions
- Equipment, Date, and Description will be auto populated into the dialog from the form.
- If Type, Priority, and Problem Code (if visible), have dropdowns, please select the appropriate value from the dropdown list.
- If any of these fields are not editable, these were pre-selected in the template and you do not have option to edit them.
- Notes – Any notes that are on the form and are configured to display on the Repair Requests dialog will appear in this notes field. Notes are editable from one Repair Request to the next. Or, add entirely new notes if there are no notes auto populated from the form into the field.
- Attachments – Select Photos and Videos Attached to the Form. All attachments that were attached to the form will be displayed here. Tap the trashcan icon to exclude the attachment from the current Repair Request. Tap Select Attachments from Form to include any attachments on the form with your Repair Request.
- Take Additional Photos/Videos – If this option is available, you can take additional photos and videos and attach them to individual Repair Requests.
Repair Request Dialog Navigation Buttons
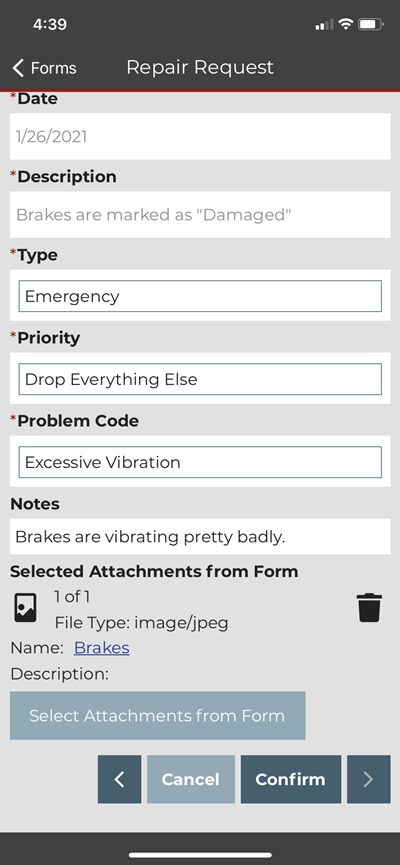
- Cancel – Tap this at any point to cancel any changes you made to the Repair Request dialog and return to the form.
- Save as Draft – Tap this to save any changes you made to the Repair Request dialog as a draft and return to the form.
- Next – If you have multiple Repair Requests, tap Next to go to the next Repair Request. You will not be able to go to the next Repair Request until you have filled out all required fields for the current Repair Request.
- Back – If you have multiple Repair Requests, tap Back to return to the previous Repair Request.
- Confirm – This button always appears on the final Repair Request. Tap Confirm to complete/submit the form. Once you sync your form to the server, the Repair Requests will be sent to B2W Maintain.


Viewing Repair Requests in B2W Inform After Sending to B2W Maintain
You will be able to access read-only views of Repair Requests by taping the Repair Requests button in Form Actions when looking at a form. For each Repair Request, this will display the date and time of when it was sent to B2W Maintain.
Form Listing Page
For each form on the Form Listing page that has Repair Requests, you will the total number of Repair Requests for a form.
Viewing Repair Requests in B2W Maintain
Repair Requests from B2W Inform will be found in the Repair Request area in B2W Maintain with all the data that was populated in the Repair Request dialog. Each Repair Request in B2W Maintain will also have a link to the form in B2W Inform that triggered said Repair Request.